

**Tutorials are best viewed on desktop.
Today molds are generally made of plaster, but were traditionally made from wood and bisque-fired clay. Plaster has two disadvantages. First, if flakes of plaster get into clay, they can blow up when fired, leaving a hole, or worse, a shattered pot. Second, plaster molds are more breakable than clay or wood molds.
Drape molding achieved special prominence in the diverting, idiosyncratic Oribe-ware food vessels of the early seventeenth century, and the irregular shapes made possible with drape moulding process continue to be much admired in Japan.
View our drape molds here.
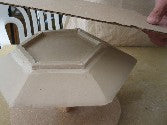
Demonstration Using a Hexagon Mold:


Powder the surface of mold with corn starch to keep the slab of clay from sticking onto it. Then roll a slab of clay into uniform thickness over a piece of cloth and powder with corn starch. Carefully lift the cloth and place it over the mold.


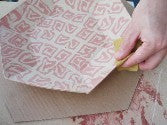
Gently press down the slab with your hands. Then use a wooden paddle, small rolling pin or bamboo paddle to close the gaps between the slab and the mold.


Remove the cloth and use the yumi to trim off excess clay from the edge of the mold. From the leftover slab piece, put it over the foot template and use the yumi to cut both side of the edges to the same angle as the foot template.


Use a ruler to mark the clay to equal width which will become the height of the foot. Then, cut the clay into equal pieces with the yumi. Lay them down on the mold and put marks on the slab.


Use the comb to score the feet and the form where they will go, applying slip and attach the feet to the form by pressing them. Let the form dry for 30 to 50 minutes (depending on the humidity). Then, place a piece of cardboard over the form against the feet.


Hold the handle with one hand and press the cardboard with other hand. Turn the form and mold over, put the form on the table and lift up the mold. The form should be separated from the mold freely. Clean up the rim with knife and then finished with a moistened chamois.
Using Two Toned Coloured Clay to Create Patterns

Roll out two or more pieces of stained clay slab and lay them on top of one another. Then roll them into coils and make them into a square or triangular shape. Use the yumi to cut them into equal length pieces. Lay them down on a piece of cloth and slightly press them together with fingers. Cover the surface of mold with a piece of cloth. Lift up the slab by holding the cloth and put it over the mold. Press the slab down gently. Then use a wooden roller or bamboo paddle to paddle them evenly.

Remove the cloth and check if all the slab pieces are stick together. Use fingers to press them together if there is still gaps between pieces. Put the cloth on and roll it gently with a small rolling pin.


Remove the top cloth and use the yumi to trim off the excess clay from the mold. Make the foot same way as above. Let it dry for 30 to 50 minutes. Turn it over and remove the cloth. Clean up the rim with knife and then finished with a moistened chamois.
Create different shapes with the drape mold


You can use a piece of steel such as a cookie cutter or wiggle wire to cut the form before removing the clay from the mold to create different shapes.
Use Objects to Create Patterns


There are a lot of objects that you can put on the mold to create a variety of patterns. For example, plastic table lace, lace curtains, textured wall paper, foam, etc. Cut out the pattern you like with a paper cutter.
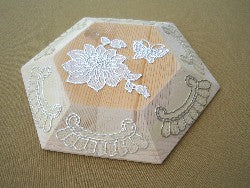

Attach them on the mold with non-water soluble glue, since water in clay slab may dissolve the glue and remove the object. Use a lot of dry clay so the form will be easily separated from the mould.

